Getting Ready
Your students will likely be itching to make a beeline for the terrain park, but you’ll first want to introduce a few basic freestyle moves, such as ollies, surface spins, and nose and tail presses on gentle terrain outside of the park. Also be sure to cover the rules of park safety and etiquette. Having laid that groundwork, the next stop is the fun box. To accommodate beginning students, set your sights on a straight box that’s relatively low to the ground. Kink boxes, C-boxes, and gaps are not your best options. If a suitably elementary feature isn’t available, you can even create a “practice feature” by painting a box-like rectangle in the snow. (While students will be able to work on board alignment and body position, one drawback of this approach is that students won’t get a feel for adjusting to a different sliding surface.) As illustrated throughout this article, another option is to use a portable terrain feature, the construction of which is outlined in “A Moveable Feat,” winter 2005. Whatever type of fun box you choose, make sure it aims down the fall line and doesn’t tilt one way or the other. Beginning freestylers may ride the box slowly and will tend to slide off to one side if it’s tilted or not aligned with the fall line. Also, be sure to show students how to inspect the feature for any gouges, exposed screws, or delaminations that can cause problems for riders.

Photo 1
Once you’ve settled on a feature to use, it’s time to bring on the students. Before letting them jump on, however, take a moment to review park safety and etiquette, and introduce basic freestyle moves such as ollies, surface spins, and nose and tail presses off to the side of the feature. The next step in the learning progression is to have each student statically stand on the fun box (photo 1), so they can get a feel for correct positioning of their board and body. Using two hands, you can often adjust the alignment of a student’s board along the long axis of the feature by simply adjusting the position of the upper body. To do this have the student apply forward and rearward pressure to the board for positioning. You can also ask him or her to do this for nose and tail presses. Next, slowly pull the student along the fun box so he or she can experience the sensation of sliding on a non-snow surface. At this point ask the student to pivot the board clockwise and counter-clockwise while maintaining a stable upper body, an exercise that provides preparation for future boardslides and lipslides.
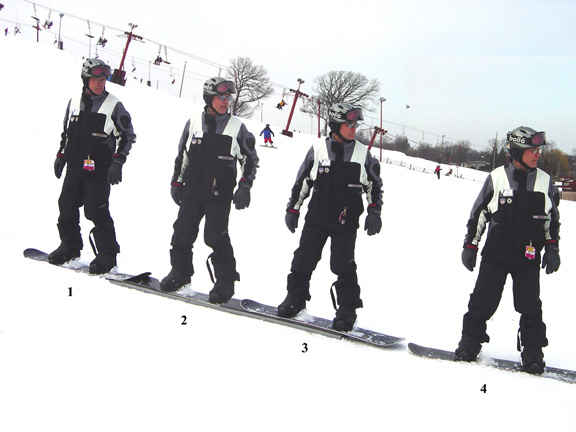
Photo 2
Opening Moves
Once you’ve completed an assisted introduction to the feature, a good first dynamic move to teach your budding freestylers is the 50/50. This move, a straight glide along the long axis of the box, is a trick that can be divided into the four major components of the ATML model: approach, takeoff, maneuver, and landing. Ask students to start off with their center of mass (CM) between their feet, hips aligned with feet, knees and ankles flexed, and facing the direction of travel (photo 2-1). On the approach the snowboard should be lined up with the box, and the rider should be looking along its long axis. Explain that it’s necessary to perform a slight extension motion or a hop to get up onto the feature, and once aboard the student will need to adjust for the increased or decreased drag on the board due to the surface material of the box (photo 2-2 and 2-3). If the drag on the board increases while it’s on top of the box, adding a little more flexion to the trailing leg can help shift the CM slightly aft to prevent a forward fall. (And I do mean shift the CM slightly, since you don’t want your students to get in the habit of riding in the back seat.) If the box’s surface is significantly more slippery than the snow, flexing the leading leg more can shift the CM forward to help the rider maintain balance. These opening moves are important because they can help students line up with the box and get a feel for how a snowboard interacts with its surface. Since there’s not a significant gap between the surface of the snow and the box’s top as the rider crests the feature, some students may simply want to start off by riding directly onto the box. You should, however, eventually encourage students at some point to use a definitive “takeoff” in the form of a hop or ollie when it’s time to learn additional tricks.
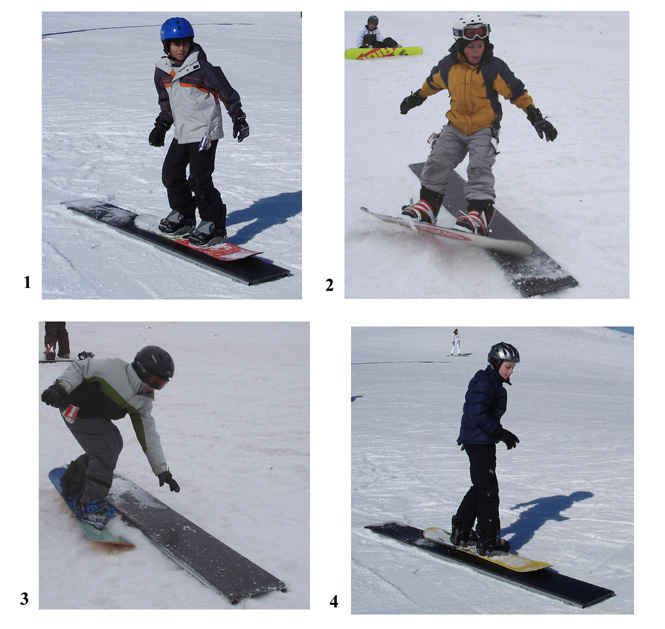
Photo 3
The shots of real students in photo 3 provide a prime study for movement analysis. In photo 3-1 the rider demonstrates good form by keeping the hips and upper body aligned along the feature’s long axis. Knees, hips, and ankles are also flexed with the CM between the feet. The rider in photo 3-2 attempts to correct a bad line by using a slight heelside turn, but in the process exits the feature. Counsel students to ride off the feature if they have a poor lineup, rather than struggling to stay on. Edging the board is virtually ineffective on a box and can lead to a fall. The young rider in photo 3-3 mounted the box misaligned with the long axis and, rather than fight it, simply rode off the side. Riders who initially have difficulty with proper alignment will benefit from looking toward the end of the fun box as they mount it. Looking at the student in photo 3-4, you can see excessive upper body twist to such an extent that the hips are almost facing in the direction of travel. Such positioning can cause the rider to unintentionally pivot the board. The problem here is that the rider is trying to align the upper body and hips with the snowboard, and learning to avoid making this adjustment may require more practice performing a straight run. Additional corrective teaching techniques can entail aiming the leading hand, hip, or shoulder toward the end of the box in order to improve alignment. Although a rider’s torso may not always react to hand movements, for some students it could prove to be a helpful exercise. For instance, simply pointing the leading hand at the nose of the board and the trailing hand at the tail can often help eliminate twisting of the upper body while freeriding. Hand movements can also serve as indicators of issues relating to core movements, so be on the lookout for them.
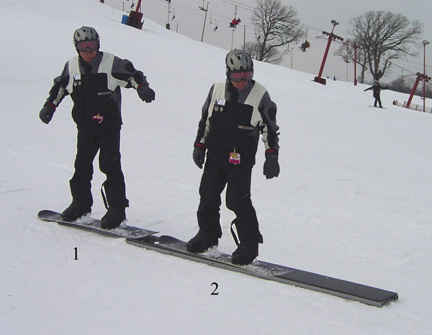
Photo 4
The next step in the progression is to practice the 50/50, but this time have riders use a slight hop to get onto the feature. Remember that in ATML methodology, the hop will essentially be the takeoff. The hop prepares the student for jumping into the boardslide position, since steering onto the box is difficult due to the discontinuity between the snow and the box’s solid upper surface. There are many ways to perform the takeoff/hop. One way to do it is for the rider to extend both legs as he or she ascends the entry ramp, then quickly flex both legs and ankles to get a little air while transitioning to the box (photo 4). If you have previously introduced the ollie, students who are comfortable with the move can ollie onto the box. To review, have the rider approach the feature with a very slight edge that’s lined up with the long axis of the box. The rider then takes off using a hop or ollie, lands flat, slides along the long axis of the feature, and exits in the straight run. At this point, it’s important to develop a good takeoff ollie/hop since a lot of terrain park features have a gap between the entry ramp and the box itself. Such gaps require that the rider get air. The student in photo 5 is performing a good takeoff with air, a move that can be used in other situations to help him negotiate different boxes and rails. Note also that the rider’s upper body is slightly rotated with respect to his lower body, a positioning that often occurs when riders primarily use the upper body for jumping. Advise your students to retract the legs in order to add stability to the jump.
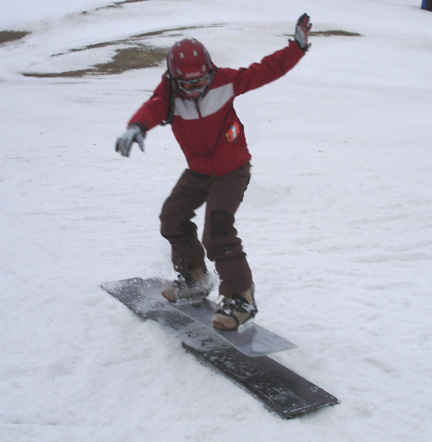
Photo 5
To add variety and a little challenge to your progression, have your prospective park rats perform a nose or tail press while doing the 50/50. The student in photo 6 has hopped onto the feature and is performing a tail press by shifting his CM aft and lifting the front of the board with his front foot. If the rider wanted to perform a nose press, he’d shift the CM forward and lift the tail of the board with the trailing foot.

Photo 6
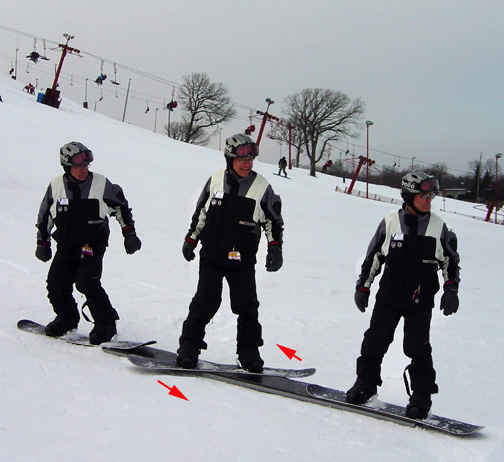
Photo 7
Crooked Grinds
Once your students are comfortable with the hop onto the box, the next step in the progression is an elementary 45-degree boardslide or 45-degree lipslide that’s sometimes referred to as the “crooked grind.” Since the maneuver requires a hop and rotation when mounting the feature, teaching the appropriate takeoff is essential. During the approach, recommend that the student use a slight heelside or toeside edge that will act as a platform for the takeoff. In photo 7 the rider is approaching with slight toeside edge engagement and will perform a frontside lipslide. A frontside approach calls for slight toeside edge engagement with the line of the box in front of the body for takeoff. The backside approach, on the other hand, usually requires a slight heelside edge engagement with the line of the box behind the body for the takeoff. Some riders make the approach without engaging either edge, but that’s a rarity. Remember, frontside versus backside deals with the approach only. After takeoff, when the nose of the board rotates over the feature, the move is considered a boardslide. When the tail rotates over the feature, it is called a lipslide. (For more details, see Doug Radefeld’s “In Limbo with Lingo? Come to Terms with Terminology,” winter 2005.) Ask the student to ride toward the feature while maintaining the direction of travel along the long axis of the box and using slight edge engagement (photo 7-left frame). The rider will need to hop onto the box using counter-rotation of the lower body with respect to a stable upper body (photo 7-center frame). The lead shoulder must be aimed down the box so that the rider can hop back into the straight glide position shown in photo 7 (right frame). Counter-rotation helps keep the overall body rotation in check so that the student can jump off the box’s end while maintaining his or her original position and direction of travel. When the student hops off the end of the feature, the twist tension in the body that’s released by jumping or unweighting will help align the board in the direction of travel upon landing. Features such as the one shown in photo 7 are short and don’t require much flexion and extension. For longer and additionally challenging features, the movements required will need to be more dynamic.

Photo 8
After your students have performed a few crooked grinds, encourage them to try full 90-degree frontside lipslides such as those shown in photo 8. Their approach should feature a slight toe-edge engagement, a hop onto the feature (photo 8-1), and a counter-rotation of the lower body with respect to the stable upper body that stops the rotation at 90 degrees (photo 8-2). To complete the maneuver, the rider needs to hop back to the straight glide position (photos 8-3, 8-4.). Make sure that the riders remember to maintain knees over toes and keep the CM low for best results.

Photo 9
Working Toward Mastery
Photo 9 provides more opportunities for movement analysis. Photo 9-1 shows a rider in relatively good position for the crooked grind with the lower body counter-rotated against the upper body and the rider sliding along the long axis of the feature. The student’s CM was slightly aft but I figured it would become more neutral with practice, which it did. The student in photo 9-2 hopped too early and engaged the entry ramp of the feature with the toe edge. Be sure to caution your students not to be too anxious to jump to the boardslide position. Advise them to be patient and time the hop near the top of the entry ramp onto the feature. Photo 9-3 captures a classic problem for beginning freestylers: the “stiffy” boardslide that often results in a backward fall. Edging the board on a box is not very effective compared to edging in snow. Because edging has always worked for the student on snow, however, he or she will often edge the board in an attempt to shift the CM forward. Unfortunately, the friction generated on plastic is not the same as that generated on snow. To help shift students away from even trying to edge on a feature, emphasize knee and ankle flexion and make sure that they keep their knees over their toes. In many cases such edging is also caused by simply allowing the board to get ahead of the body CM after takeoff, which then puts the student up and onto the board’s trailing edge. To avoid this situation, encourage students to retract the feet after takeoff and keep them under the torso during the initial flight and landing. Photo 9-4 depicts a crooked grind that lacked a proper lineup prior to mounting the feature. Once the rider chooses a line, he or she has to live with the choice for the duration of the trick. As in the 50/50 maneuver, when you see an incorrect lineup with the feature ask the student to exit the feature and try again. The ill-chosen lineup wherein the student slides off the feature (as represented in photo 9-5) is not necessarily a hopeless situation. The rider in such a position might be able to salvage the trick with style by merely shifting weight onto the foot that’s over the feature. For a visual of such a salvage job, see photo10 (left) in which the rider is malaligned and basically riding off the feature. By shifting the CM over the feature (photo 10-right), the rider can balance the board will on the feature and possibly complete the trick.

Photo 10
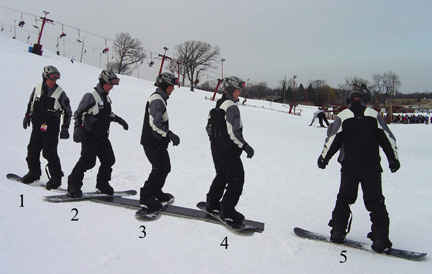
Photo 11
For students who are quick studies, you can ask them to try a 180-degree spin on the box. Encourage an approach to the feature by using a toeside edge engaged with a bit of pre-windup followed by a hop onto the feature that involves rotation rather than counter-rotation (photos 11-1, 11-2), then releasing the pre-wind. The rider needs to continue to spin (photos 11-3,11-4) before exiting in the switch position (photo 11-5). This move is essentially an extension of the lipslide (as shown in photo 8) with rotation substituted for counter-rotation. The rotation provides more angular momentum to help the rider spin 180 degrees in order to complete the trick. Table I is a review of the progression:
1. Static exercise on box holding student’s hands
2. 50/50 flexion/extension while riding onto box_
3. 50/50 hop or ollie onto box________________
4. Crooked grind___________________________
5. 90-degree boardslide or lipslide_____________
6. 180 flat spin, exit switch___________________
Teaching beginning fun box tricks is an excellent way to introduce your beginning freestyle students to terrain parks and their features. Moves on the fun box require alignment and positioning as well as the vertical and rotary movements that provide the basis for riding features and even performing free riding. The fun box is wide and tolerant of many of the errors beginning riders commit, and it is also probably the easiest rail type feature to master. By using it students can gain confidence and experience a sense of accomplishment by learning basic tricks and having a great time in the process. Photo 18 documents a student performing his first 50/50 on a typical fun box in a terrain park, after a lesson that uses the progressions described in this article. Accomplishing such a feat is an achievement that can get your students stoked with regard to freestyle. With luck, your students’ enthusiasm will be contagious and you’ll be just as stoked teaching them how to ride on features.

Photo 12
References
Hargrave, Chris. Park and Pipe Instructor’s Guide. Lakewood, CO: American Snowsports Education Association Education Foundation, 2005.
Roberts, Chuck. “A Moveable Feat: Terrain Park Features Go Mobile.” The Pro Rider (winter 2005).
Radefeld, Doug. “In Limbo with Lingo? Come to Terms with Terminology.” The Pro Rider (winter 2005).
 BACK TO ROBERTS SKI AND SNOWBOARD INSTRUCTION HOME PAGE