By
Chuck Roberts and John Roberts
Terrain parks are a
big deal at most snow sports areas because of demands by snowboarders and
skiers to experience a variety of features during their visit to your area. If
you are teaching freestyle in terrain parks, you may be approached periodically
by the area management to advise on terrain park
feature design and how to make a park interesting to riders. Although many
large resorts have terrain park designers on staff, many areas do not and often
rely on the snowboard staff for input. After all, you are a skilled rider, you
use the park and you teach students how to use the park, ergo you are an
excellent in-house consultant. Panicked? Don’t be. The following is a primmer
on the ins and outs of terrain park features, maintenance, management and park
layout.
Rails
Rails have their root
in skateboarding where skate boarders would ride and grind on a rail similar to
a handrail on stairs. Early snowboarders used fallen or bent over trees as
natural rails. As terrain parks developed, manufactured rails became
predominate in several sizes, shapes and cross-sections.
Figure
1
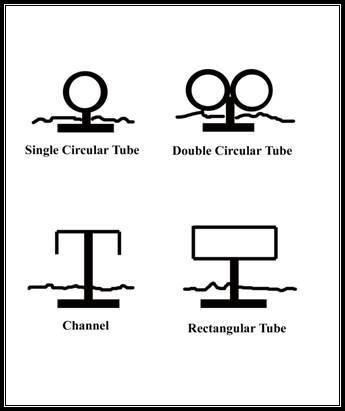
Figure 1 illustrates
the variety of rail cross-sections. The single tube rail appeared early on and
was often made of a ductile steel or plastic pipe ranging from 3 to 6 inches in
diameter. This rail is tough to ride since there are no flat areas to stabilize
the board. The double barrel tube rail
was also available and allowed for easier riding since it was flatter, and a
snowboard was less likely to tip. By
far, the most popular rail is the rectangular steel tube design: usually a 2”
by 4” or 2” x 6”tube. Sometimes, as a substitute, the steel channel rail is
found, which tends to be identical on the upper surfaces but has a different
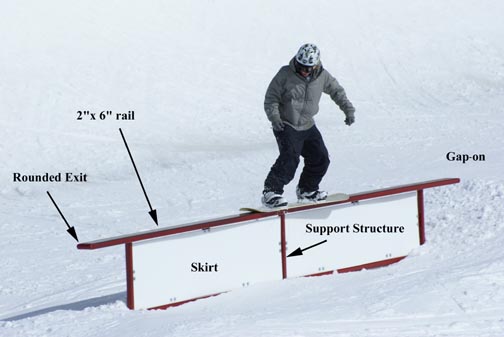
support structure. Figure 2A shows a classic, advanced, 2”x 6” steel straight
rail with gap-on ramp. Figure 2B shows another classic design where the tubing
at the entry and exit is bent down. This design is easier for your beginning park
riders, as the feature requires a less precise takeoff and dismount.
Figure
2A
Figure
2B
Figure
3
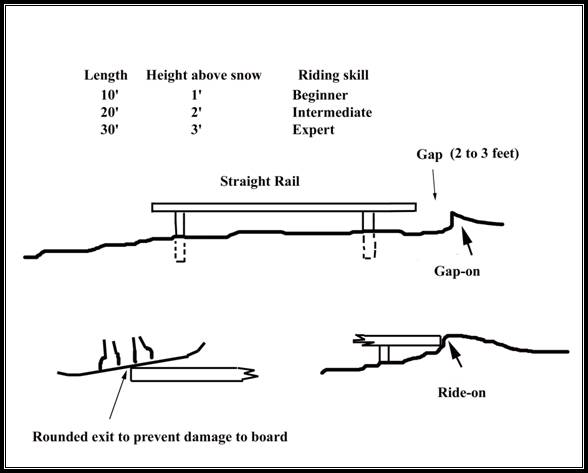
Figure 3 shows some
of the ins and outs of terrain park rails. Ramps can be either gap-on or ride-on.
The ride-on ramps are easier for your timid beginning park riders, but once
they get the hang of grinding, then the gap-on is preferred. Eye the arc of the
gap-on ramp to make sure your students, traveling at moderate speeds, can take
off and land on the rail without difficulty. A worn down ramp may not give
enough lift for your students, necessitating moving on to another feature and
notifying management. Most rails have a beveled (rounded) exit and entry to
reduce the chance of damage to the bottom of the snowboard, especially for
riders mounting the rail slowly and who do not ollie off the end (Figure 2B and Figure 3). In the past, some riders have also beveled the
edge of their snowboards to facilitate board slides and reduce the chance of
engaging an edge on the feature. Some boards are also designed with beveled
edges for grinding on various terrain park features. Rail features may need
periodic grinding of burs that form during usage. Some riders will mount a rail on edge, which
can cause a bur in the steel that may affect the riding of others. Burs not
only damage the running surface of the snowboard but can cause additional drag.
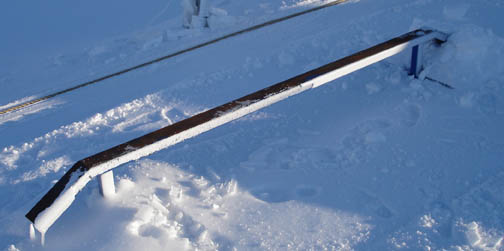
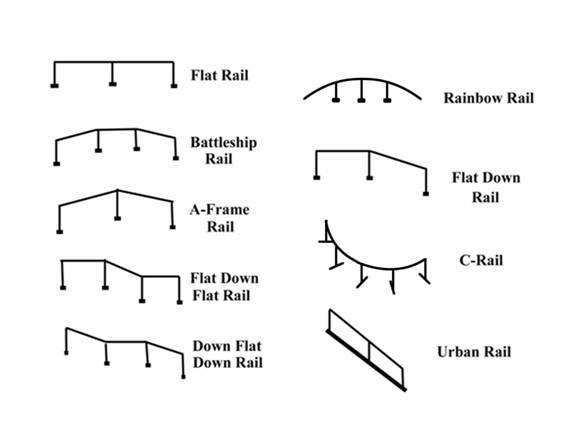
Figure 4 is a
sampling of the variety of rails found in many terrain parks. Most rails should
be installed with the long axis down the fall line to preclude the tendency to
slide off one side or the other that can occur on rails that are not placed
along the fall line.
Figure
4
Boxes
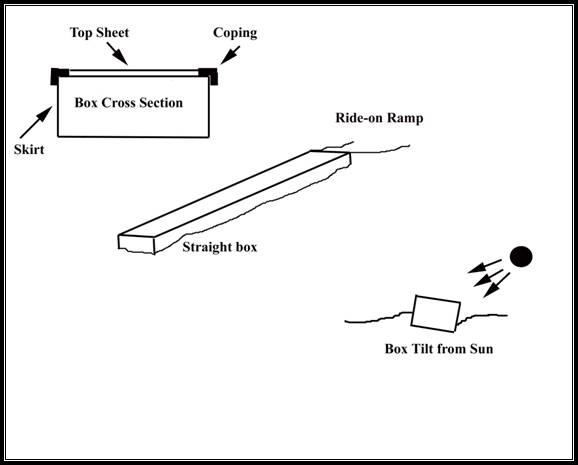
Boxes are fun features
for both beginning park riders and experts. Figure 5 shows typical construction
of a flat box which includes a top sheet, coping and the basic box structure.
The top sheet is usually a wear resistant polymer (plastic) such as nylon or
polyvinylchloride and is secured to the box structure. The coping acts a wear
resistant corner, usually constructed of steel. The skirt can be plywood or
plastic sheet as it usually covers the box structure and internal parts. Boxes
are usually pretty stable features, but under certain conditions the sun can
shine on one side and melt the snow on that side, causing the box to tilt. It is
helpful to check out the features prior to your lesson, since one that is not
level may add to teaching difficulties, especially for your beginning park
riders. As always, report to management
any deficiencies you find. Another way to tell if a feature is not down the
fall line, or is tilted, is by looking at the landing area. If the landing area
is not along the long axis of a straight feature, then there is a possibility
that it is either tilted or not down the fall line.
Figure
5
Figure
6
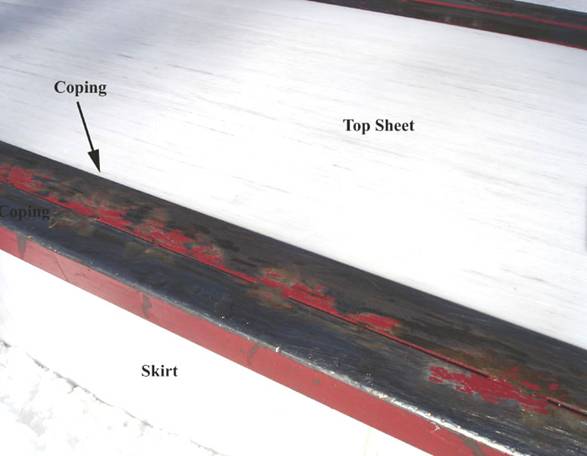
Figure 6 is a
close-up view of a typical box, showing steel coping and white polymer top
sheet. Notice the nicks on the steel coping from riders, which is a normal
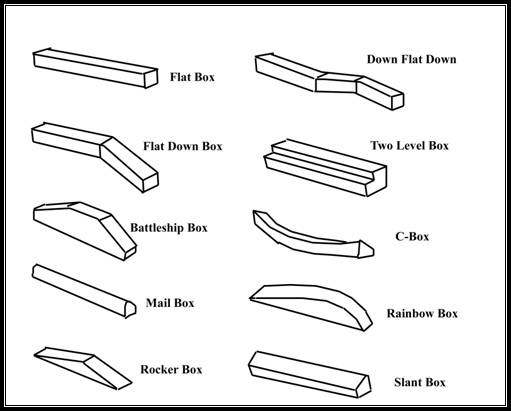
result of usage. Figure 7 is a sample of typical boxes found in many terrain
parks. The use of boxes in your terrain park lesson plan gives you great
flexibility in your teaching, since both your beginning and advanced park
riders can try out new moves on a forgiving feature. From our experience, it is
not unusual that some in the class may be working on crooked grinds, while
others are performing 720’s on a box.
Figure
7
Figure
8
Figure 8 shows a
relatively new feature that resembles a picnic table, which has a base
structure similar to that of a rail, but a riding surface that mimics a box. The
advantage of this newer design is they are easier to manufacture and easier to
move around. On the flip side, they may become wobbly after repeated usage,
depending on how the support structure is planted in the snow. “Picnic tables”
can be manufactured wider than normal boxes, which is
a big plus for your beginning park riders, as it is more forgiving of an
imprecise line up with the feature.
Jumps
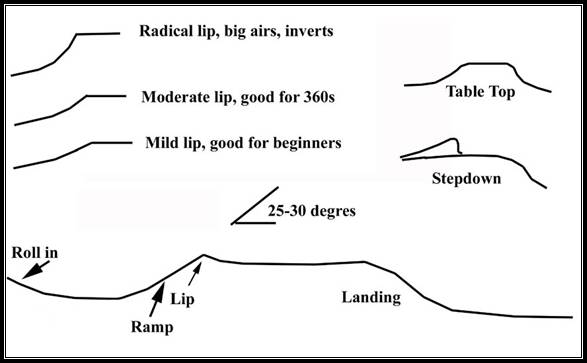
Jumps come in a
variety of shapes but have many common attributes, as shown in Figure 9. Most jumps have a roll-in to build up speed
for the jump. The ramp guides the rider up to the lip, which has a major affect
on the type of trick performed. The ramp
angle varies from 25 to 30 degrees, as does the landing area. A mild lip is
great for beginning park riders and helps them gain confidence without the
compression feel from more radical lips, which may be frightening early on. A
moderate lip is good for rotary moves such as 360’s and 540’s. The radical lip
is good for big air moves such as corks and flips.
Figure
9
The table top jump is
a common beginning jump, while the step down design is usually set up for the
intermediate and advanced freestyler. A step down makes
a more efficient use of snow, since it takes advantage of the slope of the
hill, yields more air and requires less snow than a table top.
Figure
10
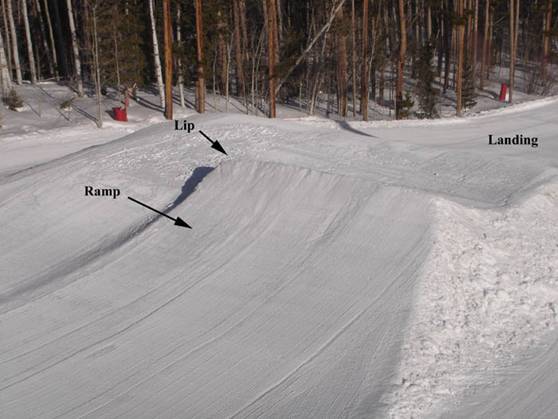
Figure 10 is a view
of a nice grooming job on an intermediate step down jump, showing a smooth,
uniform approach ramp, culminating in a moderate lip that should yield some
nice air for rotary moves. The landing area is approximately the same down
angle as the takeoff angle. Taking your students over small rollers helps them gain
confidence for the further flight distance required in this jump. Check the lip
periodically to make sure your students can handle it. Meet with the park grooming staff with any
suggestions you may have as to improving the jump performance. Perhaps salting
the lip area (on warm days, above freezing) or occasional shaping will help it
retain shape longer during heavily used periods.
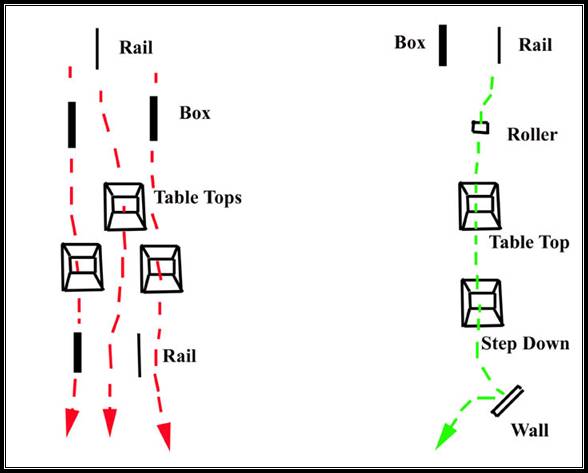
Flow through a
Your student’s
journey through the terrain park should be exciting, varied and interesting,
therefore, good flow. There is a diversity of opinion on what good flow is.
While learning a new move, a rider may be focused on one feature and may not be
interested in the relationship of the features to each other. This rider may be
hiking the feature, or may prefer a greater approach distance for setup. On the
other hand, a rider who is jibbing the park may be
interested in putting together a smoothly flowing run that uses multiple
features. On the terrain park shown on the left in Figure 11, several runs are
required to hit most of the features. The park shown on the right has features
laid out such that the rider can hit many features in one run (jibbing), and
there is adequate preparation distance between features. The park to the right
has flow. Varying the location of features, or swapping out different features from
day to day, also makes jibbing the park more interesting
to your students.
Figure
11
Several aspects of
terrain park management and design have been discussed with emphasis on
assisting the park instructor on the ins and outs of what it takes to have a
great lesson in the park. Management may be looking to you for advice on what
riders like in the park and is interested in feedback from you on how your
students liked the experience. Park
layout is evolving rapidly with many new features and design ideas being
developed each season, so keeping up your knowledge base makes you a better
instructor and a more sought after employee of your snows sports area.
Chuck Roberts has taught alpine skiing since 1970 and snowboarding
since 1987. He is a PSIA-certified Level III alpine and AASI-certified Level II
snowboard instructor at